Introduction
Recently, I have become fascinated by full-stack development and want to document my learning journey through experimentation with new technologies. I have created a series of guides to demonstrate various technological capabilities using different tools.
We'll start this series with a real-time stock listing platform that updates users on stock prices in real-time and allows live stock discussions via chat. You can download the source code and experiment with it. Any suggestions are always appreciated!
The Stack:
For this project, I am using:
- ASP.NET Core Web API for the back end
- SignalR for real-time events broadcasting
- Hosted Services for background tasks to publish events to the SignalR Hub
I am using ASP.NET Core Web API for my back end as it's the technology I am conformtable with and SignalR for real-time web features, along with hosted services for background tasks to publish events to the SignalR Hub. The app keeps users updated on stock prices in real-time while also allowing them to chat both features utilise SignalR.
Step 1: Create a .NET Core Web App
-
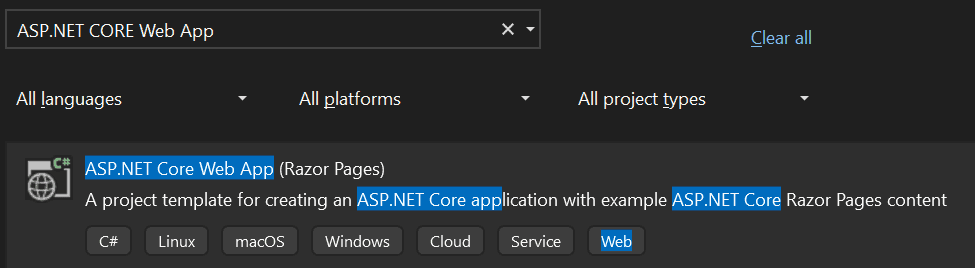
Scaffold a new ASP.NET Core Web App:
- I used Razor Pages, but you can choose your preferred programming model.
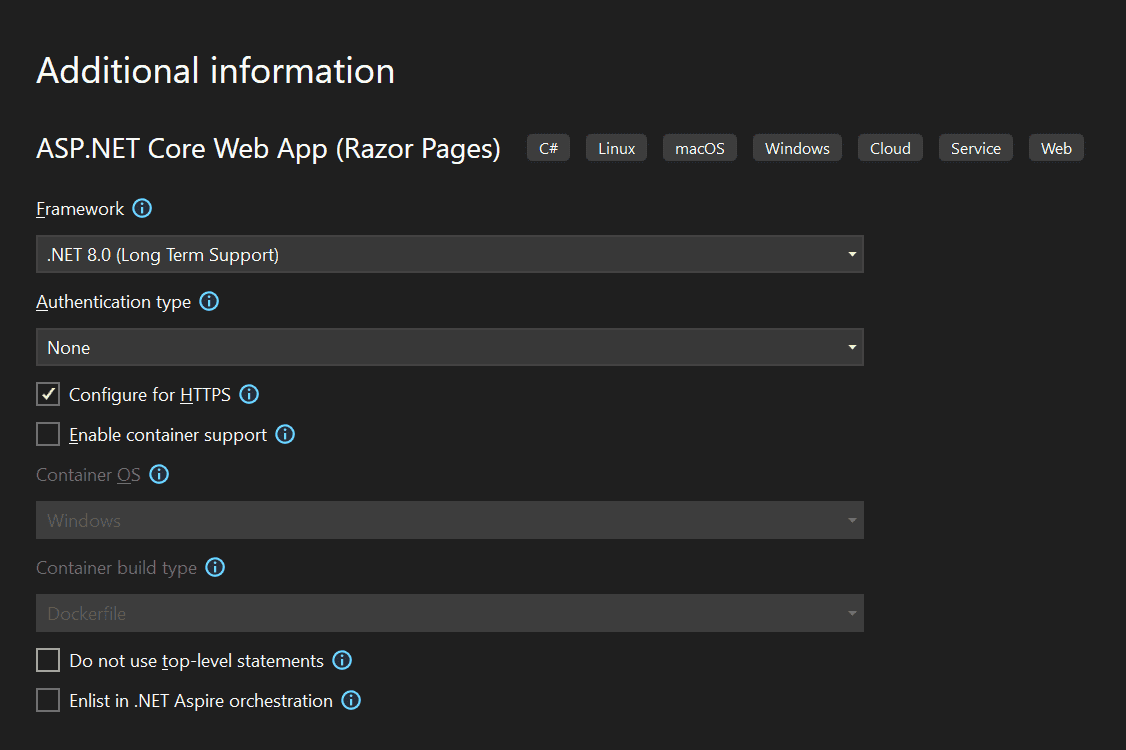
Select .NET 8.0 as the framework version:
- At the time of writing, it is the latest and greatest LTS version.
Step 2: Introducing SignalR
-
Install SignalR:
- Download the NuGet package
Microsoft.AspNetCore.SignalR.
- Download the NuGet package
-
Configure SignalR in
Program.cs:`**
builder.Services.AddSignalR();-
Define the Hub:
- Create a hub object inheriting from the base
Hubentity to broadcast changes.
- Create a hub object inheriting from the base
  public class LiveChatHub : Hub
  {
}-
Configure the Hub in
Program.cs:- This configures the SignalR service to broadcast changes through a pub-sub model.
app.MapHub<StockListingHub>("/stocklisting");Step 3: Simulation
-
Create an Interface:
- Define methods to start and stop the stock generation
    public interface IRealTimeStockProvider
    {
        void Start();
        void Stop();
}-
Implement the Interface:
- Generate random dummy data periodically
   public class FakeRealTimeStockProvider : IRealTimeStockProvider
   {
       private readonly IHubContext<StockListingHub> _stockListingHub;
       private readonly ILogger<FakeRealTimeStockProvider> _logger;
       private Timer? _timer;

       public FakeRealTimeStockProvider(IHubContext<StockListingHub> stockHub, ILogger<FakeRealTimeStockProvider> logger)
       {
           _stockListingHub = stockHub;
           _logger = logger;
       }

       public void Start()
       {
           _logger.LogInformation("RealTimeStockProvider started.");
           _timer = new Timer(async _ => await PostStocks(), null, TimeSpan.Zero, TimeSpan.FromSeconds(1));
       }

       public void Stop()
       {
           DisposeTimer();
           _timer?.Change(Timeout.Infinite, 0);
           _logger.LogInformation("RealTimeStockProvider stopped.");
       }

       private void DisposeTimer()
       {
           _timer?.Change(Timeout.Infinite, 0);
           _timer?.Dispose();
           _timer = null;
       }

       private async Task PostStocks()
       {
           decimal price = new Random().Next(101, 113);
           _logger.LogInformation($"Posting stock price: {price}");
           await _stockListingHub.Clients.All.SendAsync("PostStocks", "PostStocks", price);
       }
}-
Create a Hosted Service:
- Registers the IRealTimeStockProvider service with the concrete type FakeRealTimeStockProvider
builder.Services.AddSingleton<IRealTimeStockProvider,FakeRealTimeStockProvider>();- Call the methods from the interface to start and stop stock generation.
  public class StockPriceHostedService : IHostedService
  {
      private readonly IRealTimeStockProvider _realTimeStockProvider;

      public StockPriceHostedService(IRealTimeStockProvider realTimeStockProvider)
      {
          _realTimeStockProvider = realTimeStockProvider;
      }

      public Task StartAsync(CancellationToken cancellationToken)
      {
          _realTimeStockProvider.Start();
          return Task.CompletedTask;
      }

      public Task StopAsync(CancellationToken cancellationToken)
      {
          _realTimeStockProvider.Stop();
          return Task.CompletedTask;
      }
}- Configure the Hosted Service in
Program.cs:
builder.Services.AddHostedService<StockPriceHostedService>();Step 4: Install SignalR client side library:
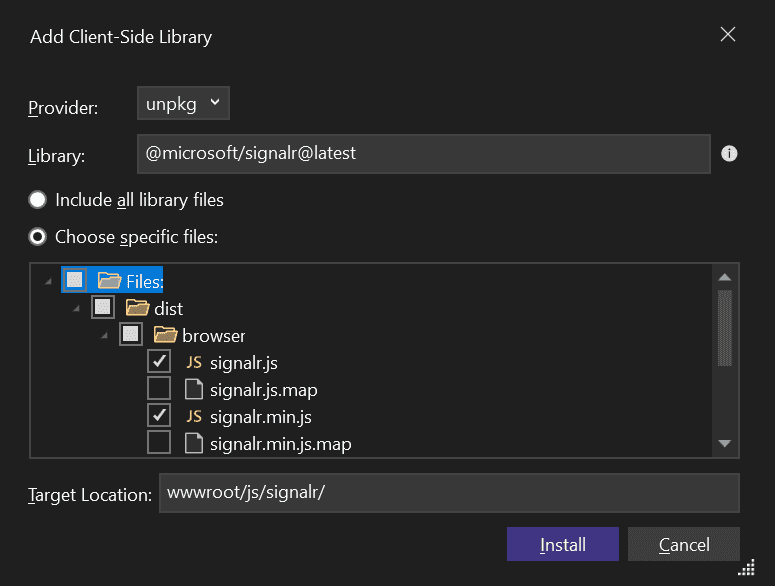
- In Solution Explorer, right-click the project and select Add > Client-Side Library. In the Add Client-Side Library dialog, choose "unpkg" as the Provider, enter "@microsoft/signalr@latest" for the Library, and select "Choose specific files." Expand the "dist/browser" folder and select "signalr.js" and "signalr.min.js." Set the Target Location to "wwwroot/js/signalr/" and click Install.
Step 5: Stock Listing User Interface
-
Create
stock.js:- Place the file inside the
wwwroot/jsfolder.
- Place the file inside the
"use strict";

const ctx = document.getElementById('stockChart').getContext('2d');

// Define the data structure for the stock chart.
const stockData = {
    labels: [],
    datasets: [{
        label: 'Stock Price',
        data: [],
        borderColor: 'rgba(20, 150, 150)',
        borderWidth: 1,
        fill: true
    }]
};

// Create a new line chart using Chart.js
const stockChart = new Chart(ctx, {
    type: 'line',
    data: stockData,
    options: {
        scales: {
            x: {
                type: 'time',
                time: {
                    unit: 'second'
                }
            },
            y: {
                beginAtZero: false
            }
        }
    }
});

// Establish a SignalR connection
const stockconnection = new signalR.HubConnectionBuilder()
    .withUrl("/stocklisting")
    .build();

stockconnection.on("PostStocks", (name, price) => {
    const now = new Date();
    stockData.labels.push(now);
    stockData.datasets[0].data.push(price);
    stockChart.update();
});

// Start the SignalR connection
stockconnection.start().catch(err => console.error(err.toString()));
- Create the HTML for the Stock Listing:
@page
<!DOCTYPE html>
<html>
<head>
    <title>Real-time Stock Prices</title>
    <link href="~/lib/bootstrap/dist/css/bootstrap.min.css" rel="stylesheet" />
    <style>
        #messagesList {
            height: 300px;
            overflow-y: auto;
            border: 1px solid #ccc;
            padding:5px;
        }

        .chat-box {
            margin:10px;
            overflow-y: auto;
            background-color: #f8f9fa;
        }
    </style>
</head>
<body>
    <div class="container">
        <div class="row">
            <div class="col-md-8">
                <h1>Real-time Stock Prices</h1>
                <canvas id="stockChart" width="400" height="200"></canvas>
            </div>
        </div>
    </body>
</html>
<script src="~/js/stock.js"></script>
Step 5: Live Chat App User Interface
- Define the LiveChatHub:
    public class LiveChatHub : Hub
    {
        public async Task SendMessage(string user, string message)
        {
            await Clients.All.SendAsync("ReceiveMessage", user, message);
        }
    }
- Configure the Hub in
Program.cs:
app.MapHub<LiveChatHub>("/livechat");- Create
chat.js:
"use strict";


var connection = new signalR.HubConnectionBuilder().withUrl("/livechat").build();

// Disable the send button until the connection is established.
document.getElementById("sendButton").disabled = true;

// Define an event handler for the 'ReceiveMessage' event.
connection.on("ReceiveMessage", function (user, message) {
    var li = document.createElement("li");
    document.getElementById("messagesList").appendChild(li);
    var now = new Date();
    var timeString = now.toLocaleTimeString([], { hour: '2-digit', minute: '2-digit' });

    li.textContent = `[${timeString}] ${user} says: ${message}`;
    scrollToBottom();
});

// Start the SignalR connection and enable the send button once connected.
connection.start().then(function () {
    document.getElementById("sendButton").disabled = false;
}).catch(function (err) {
    return console.error(err.toString());
});

// Add an event listener to the send button to send a message when clicked.
document.getElementById("sendButton").addEventListener("click", function (event) {
    var user = document.getElementById("userInput").value;
    var message = document.getElementById("messageInput").value;
    connection.invoke("SendMessage", user, message).catch(function (err) {
        return console.error(err.toString());
    });
    event.preventDefault();
});

// Scroll to the bottom of the chat when a new message is added.
function scrollToBottom() {
    var messagesList = document.getElementById("messagesList");
    var isScrolledToBottom = messagesList.scrollHeight - messagesList.clientHeight <= messagesList.scrollTop + 1;
    if (isScrolledToBottom) {
        messagesList.scrollTop = messagesList.scrollHeight - messagesList.clientHeight;
    }
}
- Amend the following html mark up beside the stock listing mark up
<div class="col-md-4">
<h1>Live Chat</h1>
<div class="container-fluid bg-light p-3 rounded">
<div class="mb-3">
<label for="userInput" class="form-label">User</label>
<input type="text" id="userInput" class="form-control" />
</div>
<div class="mb-3">
<label for="messageInput" class="form-label">Message</label>
<input type="text" id="messageInput" class="form-control" />
</div>
<div class="text-end mb-3">
<input type="button" id="sendButton" value="Send" class="btn btn-primary" />
</div>
<div class="mb-3">
<hr />
</div>
<div class="chat-box mb-3">
<ul id="messagesList" class="list-unstyled"></ul>
</div>
</div>
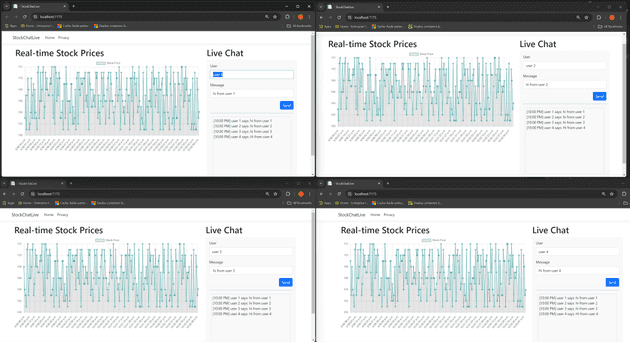
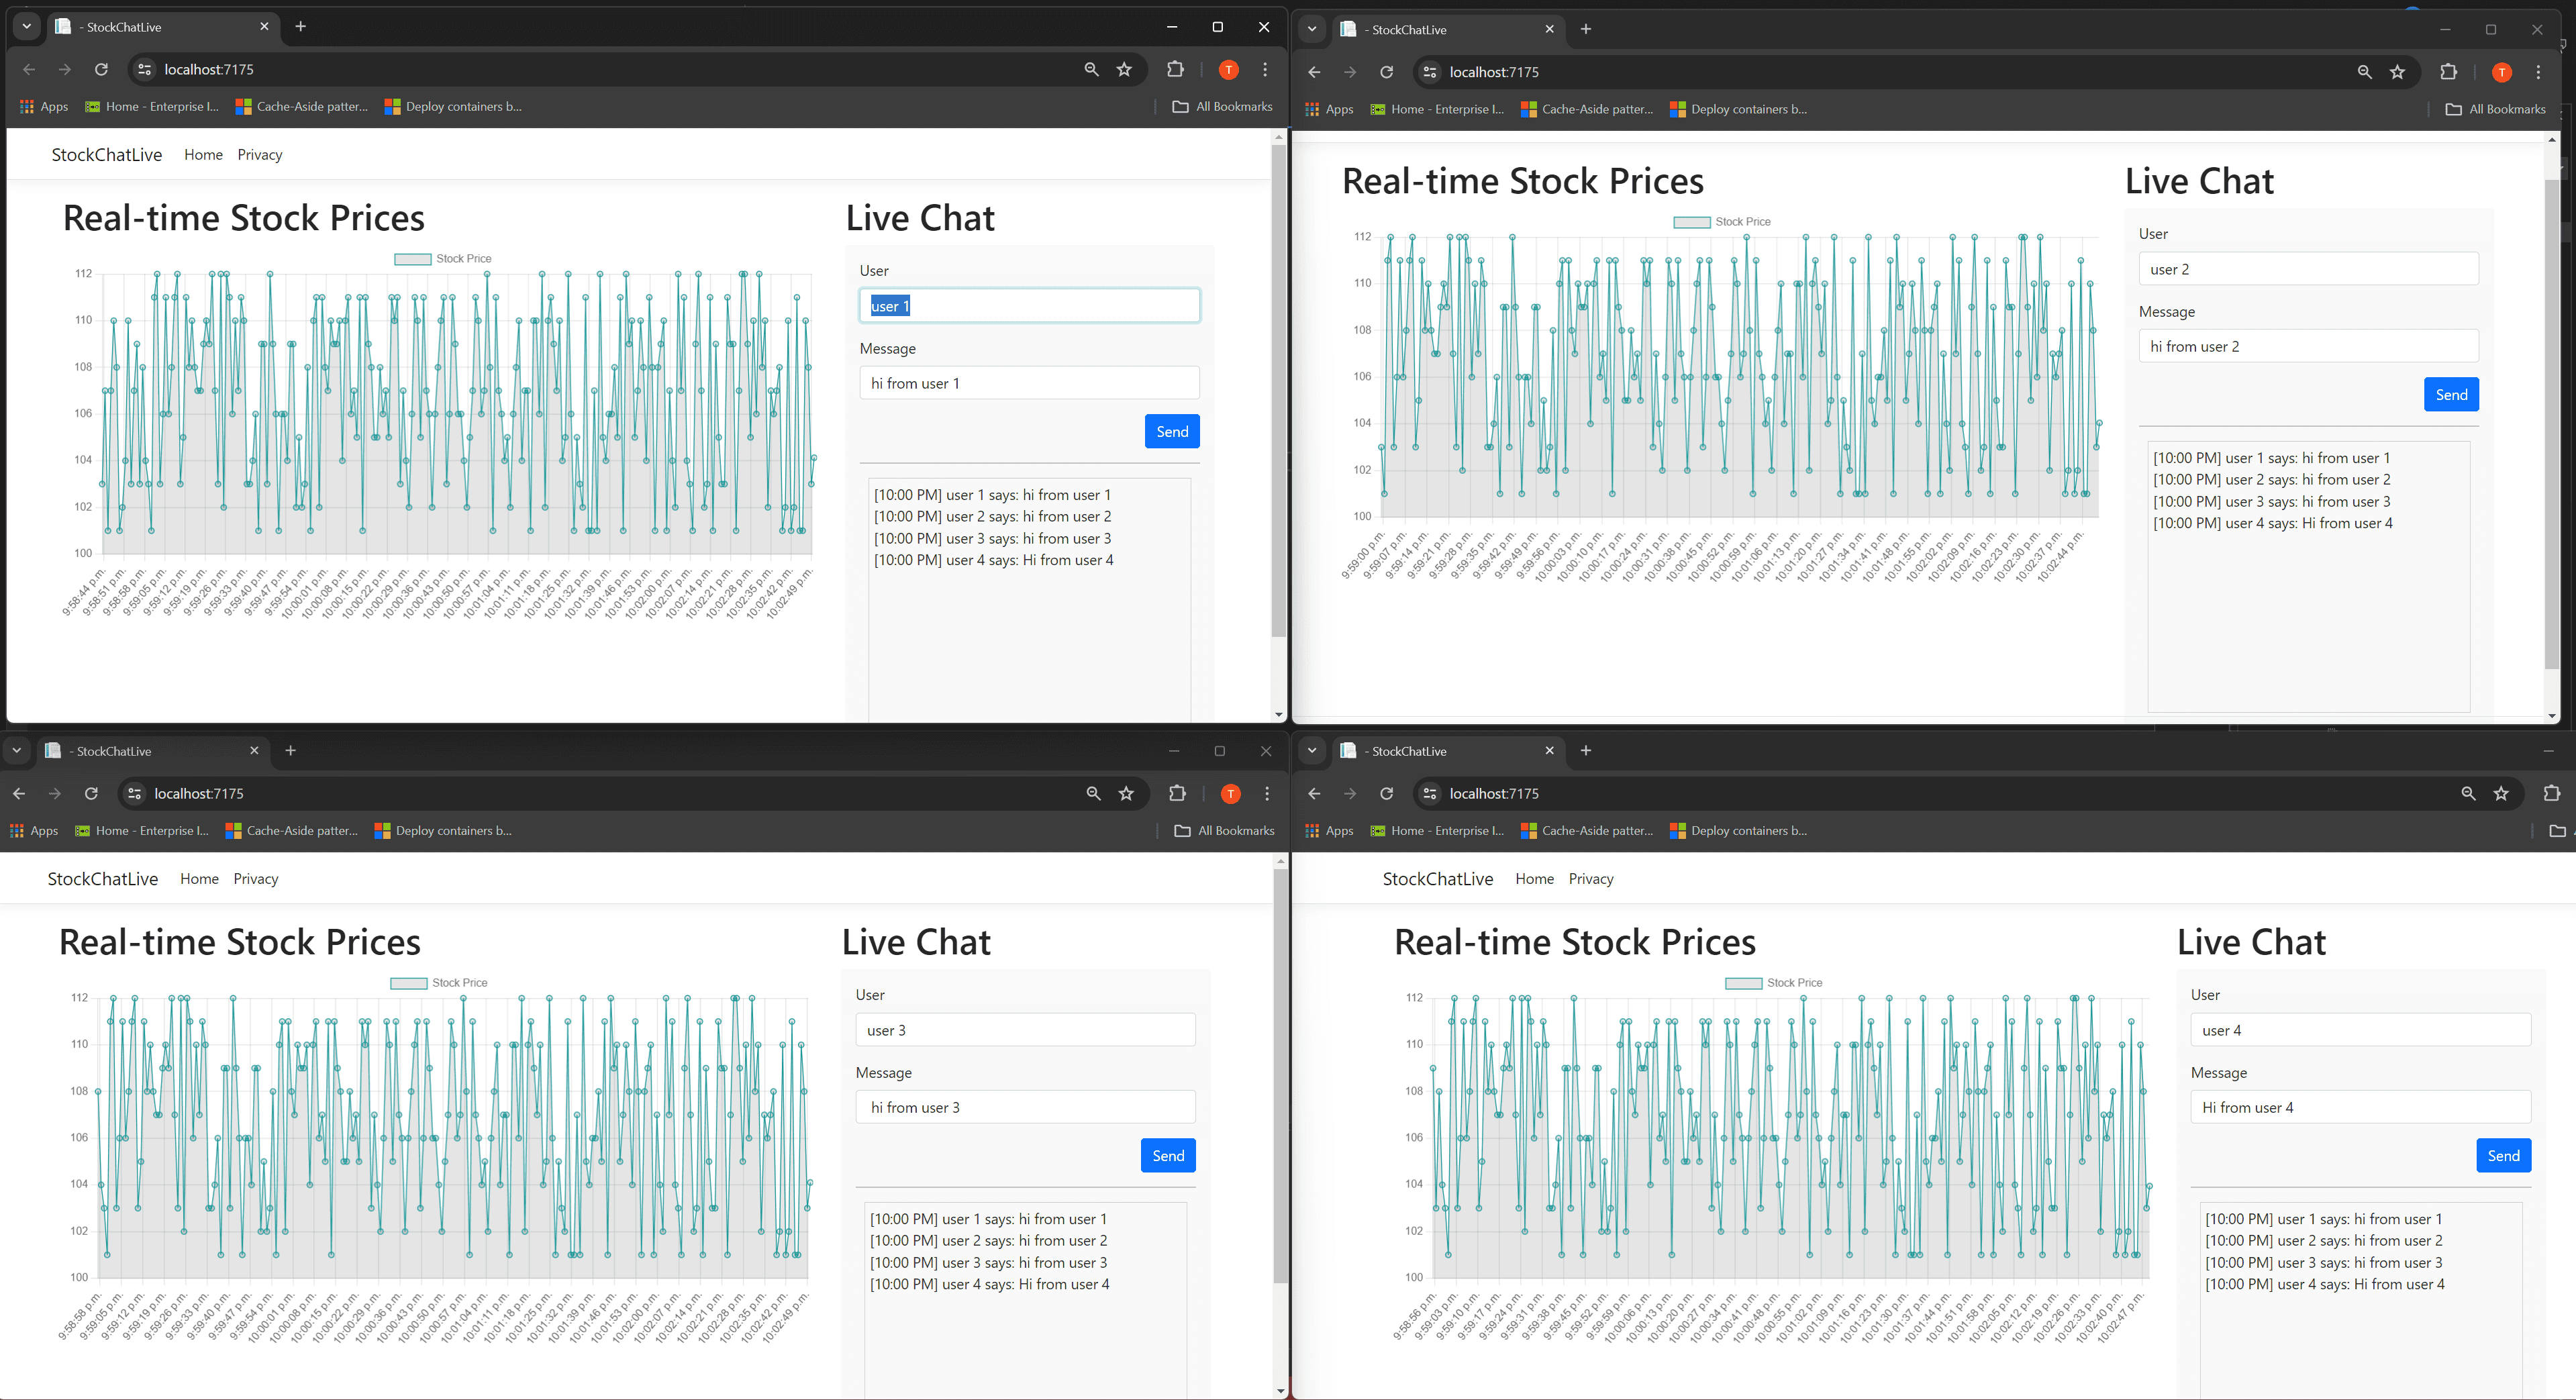
</div>- The final result look like this:
@page
<!DOCTYPE html>
<html>
<head>
    <title>Real-time Stock Prices</title>
    <link href="~/lib/bootstrap/dist/css/bootstrap.min.css" rel="stylesheet" />
    <style>
        #messagesList {
            height: 300px;
            overflow-y: auto;
            border: 1px solid #ccc;
            padding:5px;
        }

        .chat-box {
            margin:10px;
            overflow-y: auto;
            background-color: #f8f9fa;
        }
    </style>
</head>
<body>
    <div class="container">
        <div class="row">
            <div class="col-md-8">
                <h1>Real-time Stock Prices</h1>
                <canvas id="stockChart" width="400" height="200"></canvas>
            </div>
            <div class="col-md-4">
                <h1>Live Chat</h1>
                <div class="container-fluid bg-light p-3 rounded">
                    <div class="mb-3">
                        <label for="userInput" class="form-label">User</label>
                        <input type="text" id="userInput" class="form-control" />
                    </div>
                    <div class="mb-3">
                        <label for="messageInput" class="form-label">Message</label>
                        <input type="text" id="messageInput" class="form-control" />
                    </div>
                    <div class="text-end mb-3">
                        <input type="button" id="sendButton" value="Send" class="btn btn-primary" />
                    </div>
                    <div class="mb-3">
                        <hr />
                    </div>
                    <div class="chat-box mb-3">
                        <ul id="messagesList" class="list-unstyled"></ul>
                    </div>
                </div>
            </div>
        </div>
    </div>
    <script src="https://cdn.jsdelivr.net/npm/chart.js@4.2.1/dist/chart.umd.min.js"></script>
    <script src="https://cdn.jsdelivr.net/npm/date-fns"></script>
    <script src="https://cdn.jsdelivr.net/npm/chartjs-adapter-date-fns"></script>
    <script src="https://cdnjs.cloudflare.com/ajax/libs/microsoft-signalr/5.0.11/signalr.min.js"></script>
    <script src="~/js/signalr/dist/browser/signalr.js"></script>
    <script src="~/js/chat.js"></script>
    <script src="~/js/stock.js"></script>
</body>
</html>
Step 6: Running the App
-
Start the App:
- Simply run the app like you normal would using your preferred method (run into Visual Studio or the
dotnet runcommand).
- Simply run the app like you normal would using your preferred method (run into Visual Studio or the
-
Open the App:
- In your web browser, navigate to the app's URL.
-
Test the Features:
-
Open multiple browser instances to test the user interactions. Observe the real-time stock updates and live chat functionality.
-
Conclusion
This guide provides a high-level overview of creating a real-time chat and stock listing application using ASP.NET Core's SignalR for real-time features and hosted services for background tasks. I hope this tutorial helps you understand the basics of implementing real-time web applications. Happy coding!